Wednesday, March 26, 2014

Basic Java Tutorial For Beginners

Hello guys,

From today on-wards , i will be posting java tutorials on this blog. I will start with the real basics , kind of like a beginners tutorial, so that even the people who actually does not know java , can start learning.

So before we start , i suggest you to do a small search up on Google about the history of java technology.
Java is a "WORA" language, which means, "Write Once, Run Anywhere".
In other words, if you write a java program in Windows platform, you can run the same program in another platform (i.e:- Linux) without changing any part of the code.

Alright now before we get started , you should have an IDE installed in your machine to starting coding.
If you don't have an IDE , go to this  link to download Net beans IDE. 
Once you have the IDE , you have to download and install the "java run time environment" , which creates you the environment to program in java. To download "java run time environment", go to this link.

So lets get Started :-

Step 1 :- Launch Netbeans IDE.

Step 2:-  Click on File -> New Project -> Categories -> Java Application

Step 3:- Give a project name and a project location (Location where you want to save your program)

Step 4:- Untick "Create Main Class" and click "Finish"

Step 5:- Now on your projects tab (left upper corner), right click on the project which you have just created.

Step 6:- Click New -> "Java Class" -> Click Next -> Give any class name you like (But i suggest you to name it as Main for now, since my tutorial class will be called "Main") and Click Finish

You have just created a java class and now you can start coding.

Below is a basic java code,which displays a message called "Hello World".
Type in the below code just the way it is, in to the class you made and then press "F6" to compile and run the code.

Example Code:-


If everything goes well, you should be able to see the out.

Below is an example output:-


That's it , you have made your first java program, CONGRATS.
Well this is the most basic java code, next time ill be posting a code , which will take an input from the user and print it on to the screen, so stay tuned.
So until next time, good bye and take-care.

Thank you for reading this post, if you have questions, please post it down below.

Have a great day!

Note :-
"System.out.println("Your text goes here");" method is used to print text,numbers etc on to the screen.

The sentences starting with the symbols "//" are called comments. They are used to describe the purpose of the code or the algorithm used in the code.

Friday, February 28, 2014

Method to Test a Samsung phone and Method to Test for Original Android

Hello guys,

First of all i would like to thank for the 10000 blog viewers, it means so much to me. I never thought that i would achieve so much of viewers in such a short time.

So today's post will be about Samsung and this is the first post on this blog about Samsung. As we all know Samsung is responsible for some of the best smart phones out there in the world and it is the most competitive company for Apple.

Today ill be providing with you a code which allows you to test your Samsung smart phone before you purchase it and a way to check for original android .

How to Test the Phone?

To do a full checkup on your Samsung smart phone , type the code *#0*# in to your phone's dial screen.

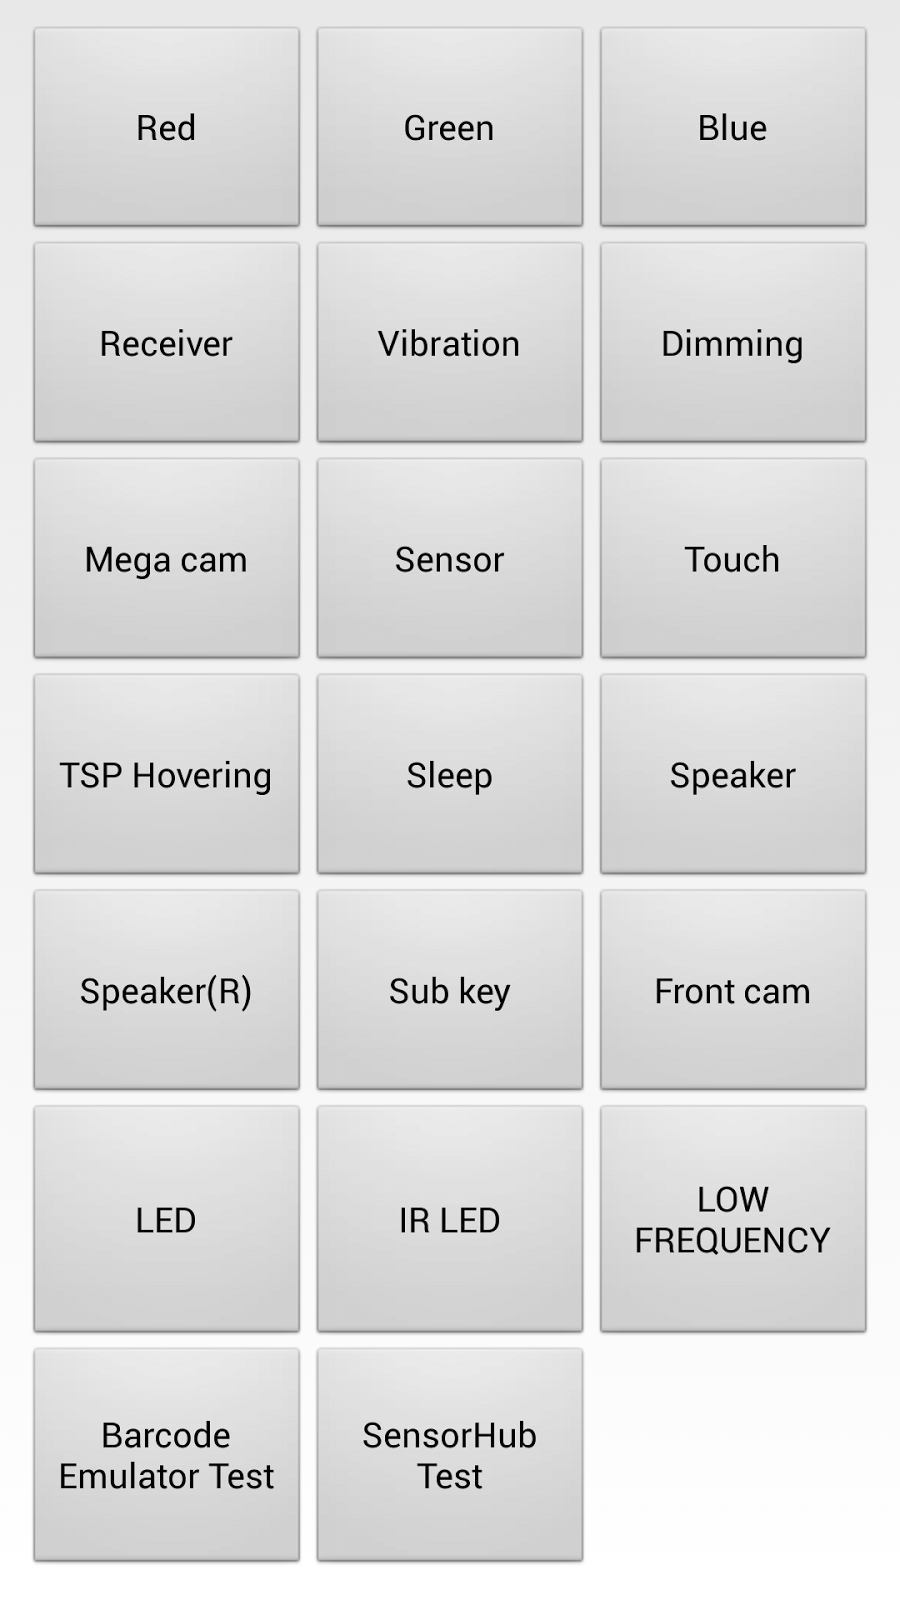
A screen will pop up, it contain's all the options to test your smart phone.


 Example screen shot of the Screen.


From this screen you can select where to start your phone's test from, for example , simply click on the tabs "Blue","Red" and "Green" to check your phone's display status. If you can see all the colors  fully on your screen , that means your screen is perfectly fine.
Like the above example , you can keep on checking every component in your smart phone , to make sure that they are full functioning, just go through all the tabs in the screen.


How to Test for Original Android ?

To test for original android , just follow the below steps.

Step 1:- Click on Settings on your phone.

Step 2:- Scroll down to "About Device" and click it

Step 3:- Scroll down to "Android version" and keep on tapping "Android Version".

Step 4:- For jelly bean version, just keep tapping on the Jelly bean image and the jelly bean will start breaking in to smaller jelly beans, so this means it's the original jelly bean version. Currently i don't know what it should display for KitKat version, but ill update this post again in the near future with the information regarding the KitKat version.


Well that's basically it, i hope you managed to test your smart phone without any problem. Next week , ill post a new topic again regarding some more Samsung codes to check for other various options in your smart phone, until then good bye and take-care.


Thank you for reading this post, if you have any questions , please comment it down below.

Have a great day!


Saturday, February 22, 2014

Mechanism to unlock Soft-Bank locked Iphones (Running IOS 7.).

Hello guys,

Its been a lot of days since my last post, i have been really busy with my degree stuff, so am sorry about not updating the blog. From today on-wards, each week ill update the blog with some new stuff.

Today ill be telling you about a mechanism to  unlock a soft bank locked iphone. Soft bank locked iphones are really hard to factory unlock , but there are some shops (rarely) which unlocks them ,still it will cost you more than $150.00.

The unlocking method which i am going to tell is not a factory unlock method, but it works. It doesn't prevent you from updating to the latest IOS like some methods and it doesn't cost you $150.00.


Using a X-sim to Unlock the Iphone. 

X-sims are small sims which you have to insert in to the sim card slot of the locked iphone along with your desired gsm sim. It is a plug and play process meaning, once you insert the x-sim with your gsm sim, the iphone gets unlocked automatically and you are able to use the iphone with your gsm sim.

The x-sim works with the current latest ios , which is ios 7.0.4.
I have personally tried this mechanism on my friend's iphone 4s , which is again a softbank locked iphone and running ios 7.0.4.
It worked straight away without any issue and i didn't even have to jail break the iphone.

X-sims can be purchased through their official site (to go to their official site click here) or
you can simply get it through eBay by searching "x-sim" along with your iphone model. X-sims are pretty cheap to buy, you can get an x-sim for $20, sometimes even less.


This is how a x-sim looks like.


The x-sim supports all the iphones even the iphone 5s and also it can unlock all the versions of ios 7.

So that's the simple mechanism of unlocking a soft bank locked iphone, well there is also the hard way of unlocking a soft bank locked iphone.
Next week ill demonstrate on how to unlock IOS 7 soft-bank locked iphones using jail break and ultra sn0w or redsnow, so until then, good bye and  take-care.

Thank you for reading this post, if you have any questions regarding the x-sim please comment it down below.

Have a great day!


Wednesday, July 31, 2013

Busy Days

Hey guys,

Sorry for not updating the blog recently, am really busy with my university stuff. Anyway i will try my best to update the blog within this week with some new stuff which will be useful. By the way do please check on my newly created blog  http://livemylifeawesome.blogspot.com/,it's about my daily life events.

So yea , be alert on the next update on this blog;).

Have a great day :)

Saturday, April 6, 2013

How to Hactivate IOS 6.1.2 using Redsnow(Supports all iphones)

Hi Guys,

Many people who don't have their carrier's official sim are unable to go pass the activation screen of their iphone but today il be showing you how to hactivate your iphone easily.

Before we start make sure you have the latest version of redsnow and IPSW 6.0, yes it should be 6.0. (Don't worry even though we use IOS 6.0 , once you hactivate your device it will be IOS 6.1.2)


Redsnow for Windows                         Redsnow for Mac        
Click here                                               Click here                         

Download ios 6.0 firmware
Click here.


So lets get Started:-

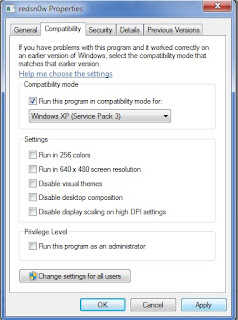
Step 1-  Once you got redsnow , right click on it and select "Compatibility" , then tick "Run program in compatibility mode for and select Windows Xp service pack 3, click ok.
 (Even if you have windows 7 running you should do this)


Step 2- Launch redsnow click Extras -> Select IPSW-> select the IOS 6.0 firmware which you downloaded.


Step 3-  Redsnow will prompt a message , just click Ok.

Step 4-  After selecting the IPSW , click back and then click Jailbreak.

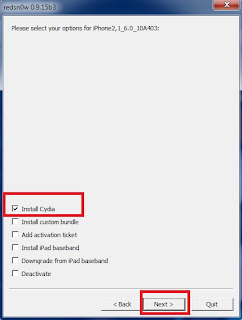
Step 5-  You will be given some options to tick, i recommend you only to tick install cydia and then click next.


Step 6-  In this step , redsnow will prompt you to put your iphone in to DFU mode and the instructions will be provided by redsnow.
You have to first connect your device to your pc and then switch it off, then click Next for the instructions on how to enter dfu mode. (Full instructions will be provided by redsnow, make sure you do exactly as redsnow says , to enter dfu mode successfully).

Step 7-   Once you enter DFU mode successfully, redsnow will start hacktivating your iphone, be patient as it will take sometime.

Step 8- Once the hactivation is done, you will be back on your lock screen. Now you can simply activate your device by following the on screen instructions on your iphone. (Just do the normal activation process)

There you go, you have now successfully hactivated your iphone without your official sim.
One more thing , i mentioned in the first  that after hactivating your idevice it will be IOS 6.1.2 not ios 6.0, you can now confirm this by just simply going to Settings -> General -> about -> version, you should be running IOS 6.1.2.

So i hope everyone of you have successfully hactivated your iphone and please do make sure to check on my other iphone guides.

Thank you for reading this post.

Have a great day!


Thursday, April 4, 2013

Thanks for the 1000 Blog Viewers.

Hello guys.

This is really isn't about a guide , just wanted you all to know that THANK YOU for the 1000 blog viewers. I really appreciate it because i never thought i would reach 1000 blog viewers this fast.
As i got 1000 blog viewers i thought of  making a new blog  about java programming , i am currently doing my degree at Apiit Sri Lanka and yea i have learnt a lot about java .
Well in future ill link this blog with my new java blog , so if you are interest about learning java , please have a visit to that blog as well.

Basically i'll be starting from the basics such as how to declare variable , how to declare methods , etc , and then to the  advanced side meaning object oriented programming.

So thank you once again for the 1000 blog viewers and be alert of my new blog ;)

Have a great day.  

Friday, March 29, 2013

Reasons for "Charging is not supported with this accessory" (Iphone)

Hello Guys,

Today i won't be giving a guide  but i will be giving reasons for a problem which most people have encountered in their iphones.  A few months back i posted a solution which worked for me for sometime but again i encountered the problem.
The error is a popup message which gets popped up when connected to the charging cable, the message is "Charging is not supported with this accessory". 
This problem seems to be faced by many people and i have seen that most of the internet answers doesn't give any proper reason for this error.

The error message is as follows :-


I thought of listing down the possible causes for this error message to occur.

Reason 1: 
You might have dust stocked inside your charging port, trying cleaning it with a brush.

Reason 2:
You might have a damaged pin in your charging port, if there is please change your charging port.

Reason 3:
You might have a bad charging cable , try using another charging cable.

Reason 4:
Your charging port might have water damage / humidity. Check your charging port for rust and check whether the water indicator is normal. If you don't know where the indicator positions are , please have a look at  the guide which i posted a few months back. (Click here to go to the guide)

Reason 5:
-This is the worst problem , your battery might be leaking / if you are lucky it might just be a bad battery.
Unfortunately for me , my battery had a leak ,I was getting the message and i did all the steps which i mentioned in the above reasons and yet it didn't get fixed.
-I then removed the phone to check the condition of the battery and to my amazement , the phone battery was leaking.  It was a bit late it has already damaged some transistors as well and that's why it was giving me the message saying"Charging is not supported with this accessory".
-I had to do a re-soldering and fix the bad transistors (my friend did the re-soldering) and i had to change my battery for good (It might have leaked again).
-Well the battery cost me around $30-$40 (original one) and now the phone seems to be working flawlessly.
So if you had done all the steps which i mentioned above and didn't get fixed please check your battery.


So guys i hope you guys found what the problem was , which caused your iphone to popup the message.
I further  advice, if you are on the 5th reason , please do act fast as it can damage you motherboard like it did to mine.


Thank you for reading this post and please do check out my guides.

Have a great day!